Save Push Notifications to CoreData & UserDefaults iOS — Swift 5
Hello guys… I will discuss step by step on how to persist push notifications permanently to either CoreData or UserDefaults (even if the app is in inactive state)
I guess you guys have basic idea about how does a push notification service work and how to work with NotificationService class (UNNotificationServiceExtension), which helps to customize the push notification. In this article I will use Firebase as my backend server. To learn about push notification in detail check my article
⭐ Create AppGroup in Apple Developer Portal : Jump to Step 4
⭐ Add AppGroup to project in XCode : Step 5
⭐ Save Notification to UserDefaults : Step 6
⭐ Save Notification to CoreData : Step 11
1. Why NotificationService (UNNotificationServiceExtension) class ?
I am going to save data to coreData with in NotificationService class !
By the definition , it says that it is an object that modifies the content of a remote notification before it’s delivered to the user.
It means we can add an image to the notification after downloading it. The downloading of image is done with in this NotificationService class.
The most important feature of this class is that, even if the app is in inactive state, it is launched on demand by system when a notification of the appropriate type is delivered to the user’s device. Another example is you could use this class to decrypt an encrypted data block associated with the notification.
It’s Life Cycle :
- The user’s device receives a notification.
- It’s lunched on demand by the system, and it runs in the background.
- The extension will perform the function to download content or perform some operation as per requirement.
- Finally, The notification will be displayed to the user.
2. The Problem with NotificationService (UNNotificationServiceExtension) class
An app extension is not an app. It implements a specific, well scoped task that adheres to the policies defined by a particular extension point and it runs in a completely separate process.
Even though an app extension bundle is nested within its containing app’s bundle, the running app extension and containing app have no direct access to each other’s containers.


So the problem is, both Extension (UNNotificationServiceExtension) & our App can’t access a single Resource 🙁
3. Solution to the problem
You can, however, enable data sharing. For example, you might want to allow your app extension and its containing app to share a single large set of data, It can be done by using a shared container, Which can be accessed by both Extension & App !

For this we need to use another feature of iOS called AppGroups
4. Add AppGroup to the App in apple Developer Portal.
- Sign in to your developer account in AppleDeveloperSite
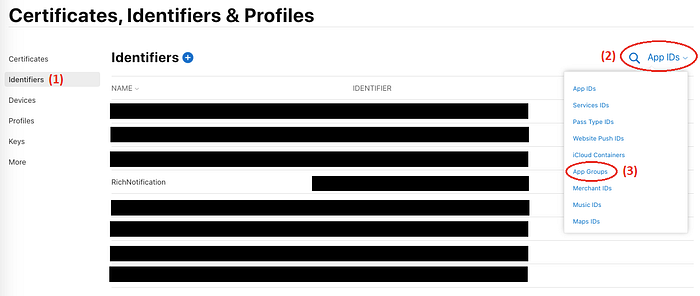
- Go to Certificates, Identifiers & Profiles > Identifiers > select App IDs > select App Groups
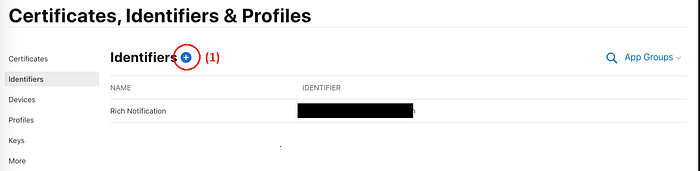
3. Select the ‘ + ‘ button to add new App Group
3. In the next screen don’t forget to select App Groups from drop down list !

4. Add Description & Identifier > click on Continue
i. don’t add ‘group’ to your identifier, it will be added automatically
ii. Your identifier should be in a reverse domain name format ( recommended by Apple )
iii. for example my Identifier is : “group.com.debashish.notificationrich”

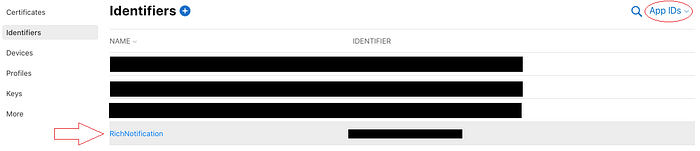
5. To add the newly created appGroup to your app, goto Identifiers > App IDs > select your app Name having the same Bundle ID as your XCode Project.
6. From Capabilities, enable App Groups > Click on Configure
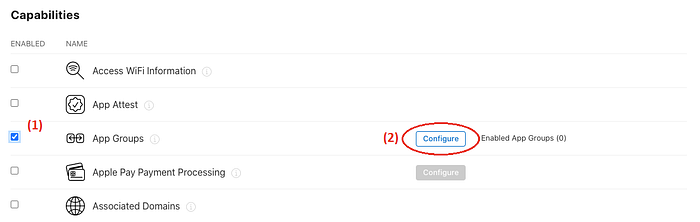
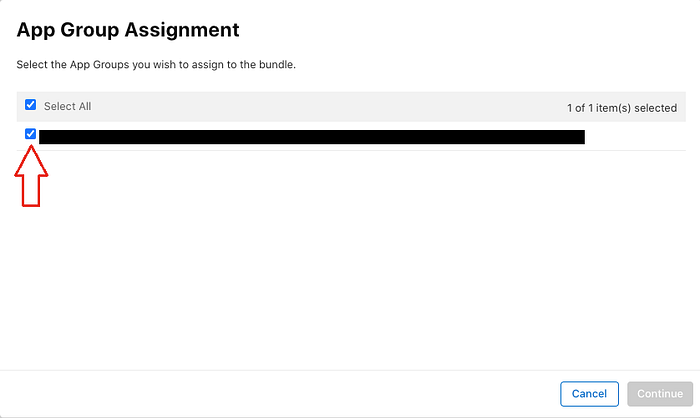
7. Now select the desired appGroup > click on Continue
5. Add AppGroup to your Project in XCode.
I guess you have added the Service extension to your project. If not, go through this ( go to step 13 ) article to know how to do this !
Goto your XCode Project
- select AppName > Signing & Capabilities > AppName from TARGET > add Capability > Select AppGroup from list > enable the app group that you have registered in developer site
i. Make sure that development team is added in Signing
ii. If appGroup Identifier is not showing, click on the refresh button.

2. Here, We will add the same AppGroup to Service. Select Service from TARGETS > add Capability > Select AppGroup from list > enable the app group that you have registered in developer site
You most use the same appGroup for both Service & your App

6. Save Notification to UserDefaults
We will save Notification to the userDefaults with in NotificationService class in this method
override func didReceive(_ request: UNNotificationRequest, withContentHandler contentHandler: @escaping (UNNotificationContent) -> Void) {
    //TODO: Save in UserDefaults
}
create a userDefaults object by calling it’s initializer which takes a suitName ( type: String ) as argument (pass AppGroup name as argument). It returns an object of type optional !
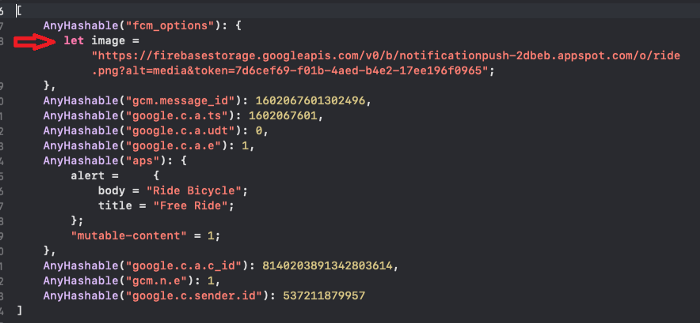
let userDefaults = UserDefaults(suiteName:"group.com.eikyoo.notificationrich")I will save both title and body of the notification to userDefaults as a single String. To parse the jSON received from Firebase I have implemented a function.
private func getNotification(userInfo: [String: Any]) -> (String, String)? {
   guard let notification = userInfo["alert"] as? [String: Any]
   else { return nil }
   if let title = notification["title"] as? String, let body =
   notification["body"] as? String {
   return (title, body)
   }
   return nil
}
7. Retrieve Data from UserDefaults
Data is saved in userDefaults. Now we can access it as follows
8. Save Data to CoreData
Now coming to the most important part of this article, we have to save notification to the CoreData. Before doing this we have to make some adjustment to coreData setup.
I will show to how to setup two different CoreData Stacks.
i. Custom CoreData Stack.
Here I have to setup managedObjectContext(NSManagedObjectContext), managedObjectModel(NSManagedObjectModel) & persistentStoreCoordinator(NSPersistentStoreCoordinator) by myself.
ii. CoreData Stack with PersistentContainer (NSPersistentContainer)
Here I will mainly use existing persistentContainer (NSPersistentContainer) to setup the stack
9. Setup Custom CoreData Stack with AppGroup
The persistentStore most be stored in a SharedContainer, so that it can be accessed by both serviceExtension & our App
The complete CoreDataManager class is
10. Setup CoreData Stack with PersistentContainer (NSPersistentContainer)
Here also the persistentStore most be stored in a shared container ! Which will be setup with a persistentStoreDescription (NSPersistentStoreDescription )
The complete CoreDataStack.swift class is
Yes … Now our CoreDataStacks are perfectly set 😃
Finally make a small following adjustment ….
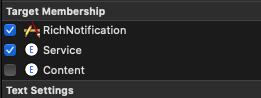
Setup the target membership of your CoreDataStack.swift or CoreDataManager.swift and .xcdatamodelid file to Service. So that they can be accessed from ServiceExtension !
select your file > goto File Inspector > set TARGET Membership to Service
Some Information about my CoreData Entities & Attributes & Core Generation.
- I have only one Entity named “Message” having two Attributes “body” & “title”

2. The CodeGen of “Message” entity is set to “Class Defination”
11. Save Notification data to CoreData
In NotificationService class create a stored property of CoreDataManager or CoreDataStack class by calling their initializers, which takes .xcdatamodelid file name as argument
let coreDataManager = CoreDataManager(modelName: "RichNotification")
                               OR
let coreDataStack = CoreDataStack(moduleName: "RichNotification")
Now with in didReceive(_: , withContentHandler: ) method save the notification
12. Fetch saved data from CoreData
To fetch the saved data, create a fetch request and perform fetch
One last thing, what will happen if the app is in foreground and device receives a notification. In that case we have to update the UI. But we can’t post a notification from NotificationService class since it is a separate process.
- In that case you can implement DarwinNotificaitons concept which is discussed in avanderlee
- Another jugaad 😅 is just post a notification from userNotificationCenter(_ : ,willPresent: ,withCompletionHandler: ) method to get notified, when a notification arrives !
extension Notification.Name {
    static let didReceiveNotification = Notification.Name(rawValue: "com.RichNotification.DidReceiveNotification")
}func userNotificationCenter(_ center: UNUserNotificationCenter, willPresent notification: UNNotification, withCompletionHandler completionHandler: @escaping (UNNotificationPresentationOptions) -> Void) {
    NotificationCenter.default.post(name: Notification.Name.didReceiveNotification, object: nil)
}
    completionHandler([[.alert, .sound]])
}
Project Link
That’s all guys … If you have any feedback feel free to ask !!